In this guide, we’ll break down the Kindle book formatting process step-by-step, so you can get your manuscript ready for Amazon KDP and start sharing your work with the world.
So, you’ve written your book—congrats! Whether you’re a seasoned author or a first-time writer, getting your book ready for Kindle can feel like a bit of a challenge. But don’t worry, formatting your book for Kindle doesn’t have to be complicated. In fact, it’s an important step to ensure that your e-book looks professional, reads smoothly, and is ready to shine on Amazon’s Kindle Direct Publishing (KDP) platform. If you’re unsure about the process, you can always turn to book formatting services to make sure your manuscript is properly prepared and meets Kindle’s technical requirements.
Why Formatting Matters for Kindle
Before diving into the technical details, let’s take a moment to understand why Amazon KDP formatting is essential. Formatting isn’t just about making your book look pretty—it’s about ensuring your readers have a smooth, enjoyable experience. Kindle readers come in all shapes and sizes, with different screen sizes and text preferences. If your book isn’t properly formatted, readers might encounter formatting issues, like messy chapter breaks or inconsistent fonts.
Proper formatting also means that your book will pass the KDP review process. Without it, you might face rejection. Imagine putting in all that work, only to find out your book won’t get published because it’s not formatted correctly. Fortunately, this is an easy pitfall to avoid with the right steps.
Step 1: Start with a Clean Document
Before you even think about formatting your book for Amazon KDP, start with a clean document. If you’ve already written your book in a program like Microsoft Word, Google Docs, or Pages, that’s great! But remember, there are a few things that won’t transfer properly to Kindle if you don’t clean them up first.
Remove Unnecessary Elements
A clean document means getting rid of things that aren’t necessary for your e-book, like page numbers, headers, and footers. These elements don’t work well in the reflowable format of Kindle e-books, so it’s best to remove them before uploading.
- Page Numbers: Since e-books are reflowable, meaning the text adjusts based on the reader’s font and screen size, page numbers don’t apply. If you’ve already added page numbers, go ahead and remove them from your document.
- Headers and Footers: These are useful in print books but can be distracting in e-books. Make sure you delete them, as they won’t translate well onto Kindle.
Step 2: Set Up Your Formatting in Word
If you’re using Microsoft Word (or Google Docs or Pages), follow these steps to get the basics right.
Paragraph Formatting
You’ve probably been using tab-spaced paragraphs while writing. However, tab spaces don’t convert well for Kindle. Instead, use Word’s built-in formatting tools:
- Set the line spacing to single instead of double (unless you prefer double for personal drafting).
- Remove any tab spaces by setting the paragraph indentation to 0. Instead, use Word’s “First Line Indent” feature to create proper paragraph indents.
Clean Up Line Breaks
Sometimes, writers use hard returns (hitting Enter/Return at the end of a line) to create space between paragraphs. But these can cause problems when the document is converted to Kindle format. You only need hard returns for new paragraphs and space between paragraphs.
Step 3: Add Essential Elements for Kindle
Now that the cleanup is done, it’s time to add the elements that make your book look polished and professional.
Create a Table of Contents (TOC)
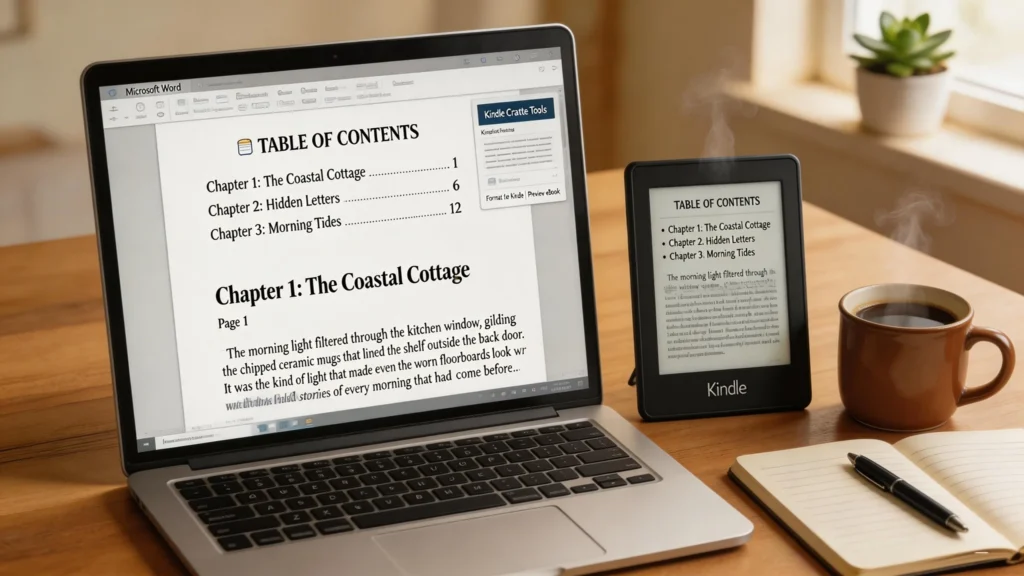
One of the coolest features of Kindle e-books is the interactive Table of Contents (TOC). It allows readers to jump to any chapter with a single click. So, don’t skip this step! Here’s how:
- Use Heading 1 for chapter titles and Heading 2 for subheadings.
- In Word, click References > Table of Contents, and choose the style you like. This will generate a clickable TOC when you convert it to Kindle.
Front and Back Matter
Don’t forget to add front matter (title page, dedication, copyright page) and back matter (author bio, bibliography, etc.). These pages give your book a professional touch and are a must for non-fiction works.
You can also add a cover image to the front matter, but remember, this is handled separately when uploading your manuscript to KDP. Keep your cover image file separate from the manuscript to avoid slow uploads.
Step 4: Use Kindle Create for Final Formatting
Once your document is prepped, it’s time to use Kindle Create, a free tool from Amazon that helps you finalize the formatting. Here’s how to do it:
- Download Kindle Create and install it.
- Open your Word document in Kindle Create. The software will automatically scan your document and apply Kindle-friendly formatting.
- You can then adjust headings, add or edit your TOC, and apply themes. Kindle Create allows you to preview your book on different Kindle devices to ensure it looks perfect.
Step 5: Final Checks and Publishing
After you’ve formatted your book in Kindle Create, take a moment to preview it on a Kindle e-reader, phone, or tablet. This is your chance to spot any formatting errors before you hit publish. Once you’re satisfied with the final version, it’s time to upload your manuscript to KDP.
Uploading to KDP
Here’s the simple process:
- Log in to your Kindle Direct Publishing account.
- Create a new book project or select an existing one.
- Upload your KPF file (Kindle Package Format), which is the file created by Kindle Create.
- Fill in your book details, including title, author, description, and keywords.
- Set your pricing and royalties.
- Hit Publish and let Amazon handle the rest!
Why Use a Book Formatting Service?
If this process feels a bit overwhelming, you’re not alone! Many authors turn to a book formatting service to ensure their manuscript is ready for Kindle publishing. These services can take care of everything, from document cleanup to Kindle-specific formatting.
If you’re looking for professional formatting services in the USA, check out our book formatting services to get your eBook and print books professionally formatted. This can save you time and help avoid potential formatting issues that might arise during the publishing process.
Common Formatting Pitfalls to Avoid
Here are a few mistakes that many authors make when formatting for Kindle:
- Inconsistent chapter breaks: Make sure each chapter starts on a new page by inserting page breaks between chapters.
- Non-clickable TOC: Remember to use Word’s built-in Heading styles and generate a clickable TOC.
- Improper image formatting: Keep images at their original size and avoid compressing them. Too much compression can lead to poor quality in the final e-book.
Wrapping It Up
Formatting your book for Kindle might sound like a daunting task, but with the right tools and a little patience, you’ll have a polished e-book ready to share with the world. By following this step-by-step guide, you’ll ensure that your book is properly formatted, looks professional, and is ready to be published on Amazon KDP.
Happy publishing, and best of luck with your Kindle journey!
If you’re looking for professional help to make sure your e-book and print book are up to snuff, check out our book formatting services and get your manuscript ready for publication today.
FAQs
1. Do I need to hire a professional for Kindle book formatting?
While it’s possible to format your book yourself using tools like Kindle Create and Word, many authors choose to hire book formatting services to ensure a polished, professional result. These services can save you time, handle technical issues, and make sure your book meets all of Amazon’s requirements for Kindle Direct Publishing (KDP).
2. What is the best software for formatting a book for Kindle?
The most popular tools for formatting books for Kindle are Microsoft Word, Google Docs, and Kindle Create. Microsoft Word and Google Docs are great for initial drafting and basic formatting, while Kindle Create is perfect for finalizing the e-book and previewing how it will appear on different Kindle devices.
3. Can I upload a Word document directly to Kindle KDP?
Yes, you can upload a Word document directly to Kindle Direct Publishing (KDP), but it’s important to ensure that the document is properly formatted before uploading. Use proper headings, paragraph formatting, and a clean Table of Contents (TOC). Kindle Create is also a great tool to help you finalize your manuscript before uploading.
4. How do I create a Table of Contents (TOC) for Kindle?
To create a Table of Contents (TOC) in Word, use the built-in Heading styles (Heading 1 for chapter titles and Heading 2 for subheadings). After formatting your headings, go to the References tab and click Table of Contents to generate a clickable TOC. Kindle Create will automatically detect your TOC once the manuscript is uploaded.
5. What are the common formatting mistakes to avoid when preparing for Kindle?
Some common mistakes to avoid include:
- Inconsistent chapter breaks: Always insert page breaks between chapters.
Non-clickable Table of Contents: Make sure your TOC is linked and interactive. - Improper image formatting: Keep images at their original size and ensure they are properly aligned.
By avoiding these issues, your e-book will look more professional and be easier for readers to navigate.
For more detailed information on the process of formatting eBooks for various platforms, you can refer to the Wikipedia page on eBook formatting.